
Continuing the blog serialisation of my popular X-Pro Series lust/hate/love story:
Although this week, we’re going to run with something I wrote very recently!
Part 120: Capture One Express for Fujifilm: A Basic Guide
So apologies if you only just saw this as a webpage, but with so much buzz around Capture One Express for Fujifilm, and so many users trying it out, I decided to combine my two part webpage article into a single blog post
I’m really pleased about the partnership between Fujifilm and Phase One to bring us Capture One Express (hereafter written as C1E)
Having run a few images through it now, I’ve decided to write a basic guide about how some of it works
Now C1E maybe new to us in Fujifilm land, but Sony shooters have had something similar for a while, and the full pro version has been around for a very long time
So there’s a TON of info out there folks, this guide really won’t be the last word in all of the things that this software can do, and it’ll also be a little skewed in regards of how I like to work.
Let’s start with the basics, you’ll need to install the software!
You can download Capture One Fujifilm Express here
One you’ve clicked through the usual next/next/I accept/next/finish routine to install software you’ll need to launch the app, where you’ll be confronted with the following:
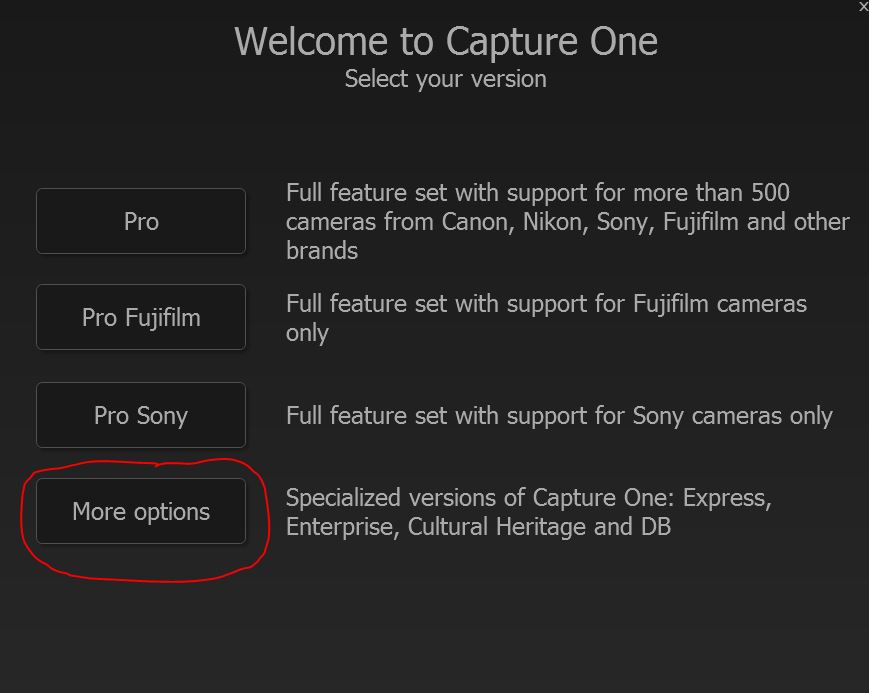
You’ll be wanting More Options (and don’t we all? 😉 )

You’ll be wanting Express Fujifilm

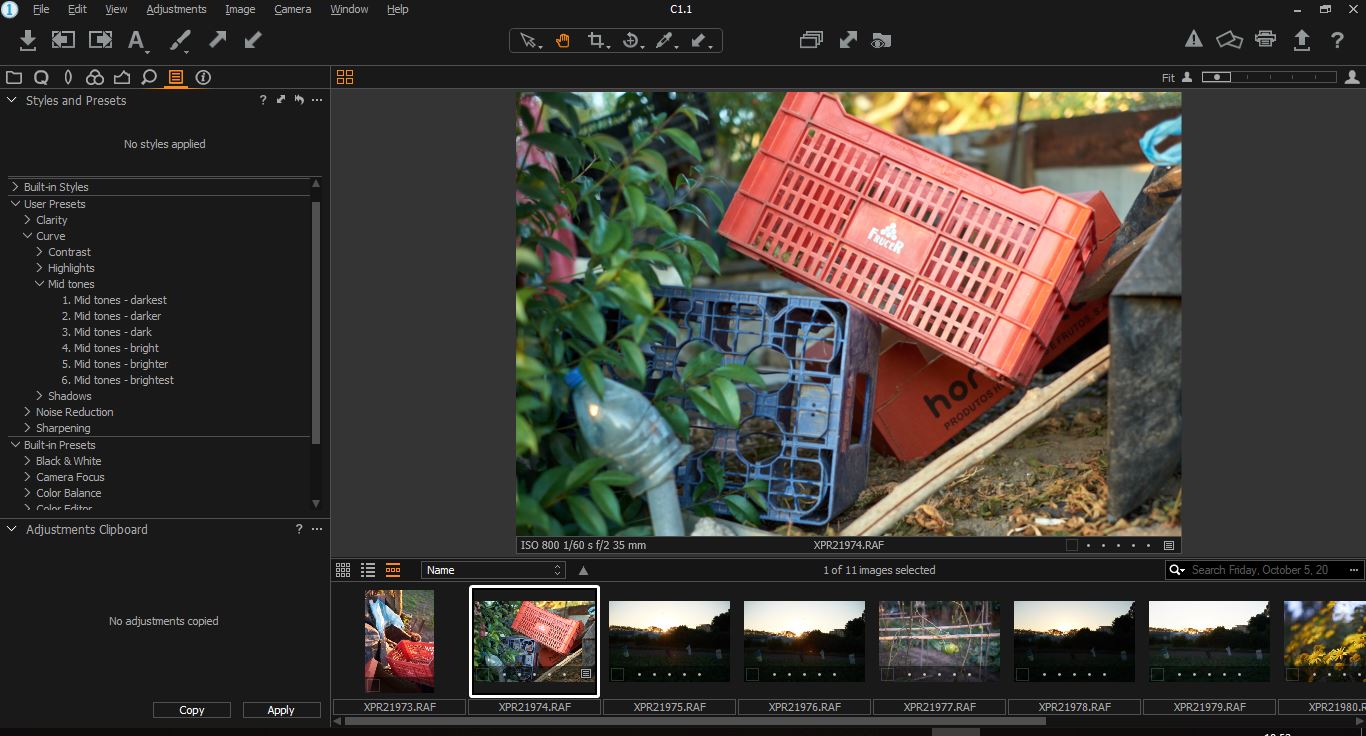
Once it opens, you’ll want to import some pictures to edit. Click the Import icon that I’ve circled at the top left
When it first imports RAFs C1E will set up some sort of acceleration to speed things up in the future. It’s always good to have something to look forward too, but right now you’ll be looking at a status bar crawling along the screen
I (currently) have no interest in using the catalogue feature… so I haven’t looked at it therefore I haven’t written about it…
If that feature interests you, here’s Capture One’s Tutorial Page for the catalogue.
One thing that might interest you, is importing all of your raw files straight off the SD card..

1. Select the SD card from Source where shown above
2. Select an appropriate location from the Destination drop down (“chose folder”), as current location will just copy them back to the SD card (because “current location” is where they are already) and that might create some sort of time paradox or something… well ok lost pictures anyway 🙂
3. If you’re feeling fruity and brave, you can tick the eject SD card and erase SD card as shown (being neither you’ll see I leave these blank)

Personally, what I always do, is copy the raw files off the SD card and into an indexed location on my system that I can find later, with a meaningful name… I know… so 1990s of me 😀
So here I do want current location, as these files are already where they’ll be stored. Notice I also tick “exclude duplicated” this is because I might add more files to that location later, and I only need the import box to show me the new files

The tone curve drop down from the Colour toolset
Once we have some files imported, you’ll want to edit them. (yours probably aren’t just a collection of kitschy crap that you rushed out to shoot for a web article, but the principle is the same)
To start with, I’d pick a starting point tone curve. You can see the options in my screen shot and you decide which one works best for your image(s)

The WB Tool
From the same toolset you can set the White Balance. This is pretty standard fare (as it should be) with the usual drop down menu options and the 1. Auto (let the app decide for you) option and the 2. Eye Dropper tool, where you pick something in the picture that you want to be the base for the WB

ONE THING THAT NEEDS MENTIONING is that if you pick a tool (eg WB) you’ll need to click on the hand or arrow icon afterwards in order to exit out of the tool (eg WB) that you were using. Possibly this can be turned off in the preferences… I forgot to look… normally someone writes in to tell me, I’ll let you know

Viewing distance and navigation
As everyone knows, you need to look at a photo at 100+% zoom in order to see if you like it or not… 😀 😀 😀
Relax, C1E’s got this…
If you look where I’ve skilfully marked “1” on the image, this slider makes the image bigger and smaller. Clicking on the head and shoulders icon on the far right automatically takes you too 100% view, the head and shoulders icon on the left returns you to the fit screen view. (Neither head and shoulders icon made my dandruff go away though)
Re where I’ve marked up “2” on the image, when you’re using the hand tool RIGHT CLICKING (in windows, dunno about Mac… maybe you just have to think about it and it automatically happens or something) brings up that helpful little navigation window

The Exposure Tools
Here we have the default tools that you’ll probably be familiar with if you’ve ever used any image editing software… and if you haven’t then you’ll quickly pick up on what they do.
1. The histogram, this will show you the distribution of bright/dark values in your image and updates its shape as you make edits.
2. As you’d expect.. these sliders control the items labelled – move the sliders to see the effect
3. Highlight and Shadow recovery. Move these sliders to recover highlights and shadows. Unlike many apps (eg Lightroom) these sliders can’t be used in reverse. So if you want to brighten highlights and darken shadows, then you’ll need to use the contrast slider, tone curve and/or levels tools
4. The levels tool, You have three vertical lines and dragging them will change the Shadows/Midtones/Highlights

The Details Tools
Once you’ve got your image as shiny or as dark as you want it, you’ll want to sharpen it and apply any noise reduction you want.
Like most apps C1E adds what it feels you need as a default…
I’m a weird one when it comes to sharpening and NR, and endeavour to use as little as possible… I’d also rather use structure than clarity, as clarity can introduce artefacts, but structure can bring out larger subjects in your image…
…whatever.. these are personal choices and you should find your own way
1. Is sharpening
2. Is Noise Reduction
3. Is Clarity and Structure

You can see the settings I PERSONALLY selected for this throwaway shot, and now how it looks at a normal viewing size
Now we’ll cover multi image edits, presets, user styles, curves, colour editing and black and white editing!
When we have images that share a commonality (usually ones that were taken at the same time/place/light/subject) it can be very useful to apply a series of edits to many images at once.
C1E can do that for you, but first you’ll need to set up a couple of things.

Thsi can be done via the menus, but I like to use toolbars. In order to do this you’ll need to right click on the area at the top of the screen which makes the CUSTOMISE button appear – click on this button

Here you can see the icons that can be dragged onto the tool bar, I’ve circled
1. Hot Folder (which I assume is for tethering)
2. Copy and Apply Adjustments
3. Edit all Selected Variants

You LITERALLY drag the icons you want onto the tool bar at the top of the C1E screen

To use the copy/paste across many images, first you’ll need to click the stacked images icon as shown above, then click on the image that you want to copy the edits from

Next click on the DOUBLE HEADED ARROW icon, this will bring up the clip board menu from which you can select which edits you want to copy, the default is all the edits you’ve made to the selected image, so you’ll need to UNTICK any you don’t want to copy and paste to a different image

Next select the images you wish to apply the edits too

To paste the edits to your desired image(s), can either right click on one of the selected images and click Apply Adjustments or if you prefer use the Apply function from the doubled headed arrow tool (which you used to copy the adjustments in the first place)
Now you know how to apply edits to multiple images, let’s look at a few more advanced editing techniques you can use.
At the time of writing (mid October 2018), C1E doesn’t support the native Fujifilm Film Sims. There’s some user developed ones out there that can get you by until C1E adds its own, but there’s also another way to quickly and easily change your colour profile…

Next to where it says ICC Profile on the colour tab, you’ll find a drop down menu that shows which camera you used (in my case it says Fujifilm FinePix X-Pro2 Generic) in that drop down menu you’ll find the line item Show All. Click this.

This brings up the list of C1’s profiles for lots and lots (and lots) of cameras… Pay attention to the colours in the image I have selected….

…..they completely change as I select a different camera profile. There’s MANY cameras listed in there, so you’ll just have to play around and find your favourites. I think of this as a Non-Fujifilm film sim fudge, but it’s a useful ‘hack’ to have.
In a similar vein is the lens profile menu.

Typically you’d want to use the manufacturer profile if you’re using a Fujifilm with Fujifilm glass… But what if you’ve adapted a lens from another manufacturer to use on your Fujifilm?

As with the camera profiles, first you’ll have to click Show All then a list of all the supported lenses with a C1 profile appear… in this example, perhaps you have a Leica 35mm Summicron on your Fujifilm, so you might want to use the profile for that lens.
While we’re on the subject of lenses….

The parts I’ve circled here enable you to add (or remove) a vignette and reduce/remove purple fringing
Also in the lens tools section is the crop tool
 If you click on the icon that looks like an upside down @ symbol (that I’ve circled) you get a tool that enables you to draw a straight line in the image, and the image will be pivoted around this line so that the image is level.
When you’ve finished using this tool, you’ll need to click on either the hand or the arrow icon to exit out of it
From the same toolset, you can crop the image

The crop tool, selecting aspect ratio
 You can specify various if you want to crop outside of the image. AGAIN when you’re finished you’ll need to click on either the hand or the arrow icon to exit from the crop tool
Next we’ll look at colour editing.
 On the Colour (Color) tool page you’ll find the colour wheel (well the parts of it that C1 have bothered to mark with a line, I mean just because green and yellow are next to each other it doesn’t mean there’s no dividing line… I digress… Adam get on with it)
If you see where I’ve circled the eye dropped tool? This tool allows you to select a colour to be edited

Clicking the View Selected Colour Range allows you to work with just the colour you want (so no I didn’t suddenly get into selective colour photography)

Here I’ve made the yellow flowers, even more yellow (I think the extra yellow represents the anguish of the human condition as the flowers hold up a mirror to society, or possibly it’s just some kitschy crap I snapped for this article)
Of course it may be that you really want to make a black and white photo.
 Still in the colour tools section, you’ll find the Black and White tool (and yes, for this kitschy crap shot, I couldn’t even be bothered to leave the house to make the sample photo)
The Black and White tool is easy to use, simply tick that box (circled) and….
 …instant black and white, but what if you want to blend (see what I did there? I’m here all week folks) the tones of your BW conversion a bit? Well you do this by using the colour sliders (like in LR, Silver Efex etc etc) to control the luminosity of the various hue tones (and SERIOUSLY and on an unrelated note, if you want to teach yourself colour, playing with these sliders in BW really shows you what hues make up the colours you see in a colour image)
After you’ve made a BW image you might want to add some fake grain…
To do that, head over to the Adjustments tool page
 C1E has some input presets to control various things
 Here can see the effect of adding their various grain presets (I think the pro paid for version lets you specify your own grain)
And speaking of inbuilt styles…
C1E has a whole bunch of them for you to use either ‘as is’ or as the basis of further editing

Here we see the in-built styles for contrast (note that others are available)
But what do these presets actually do?

The change the tone curve, you can refine (or f__k up, it’s your choice) the tone curve by dragging these points around or by creating new ones
Speaking of presets and styles.. you might want to create your own
 In the single tools (so this one is sharpening) you can click on the three horizonal lines icon and save the current settings as a User Preset

You’ll need to select which parts of the tool options make up your preset

Then save it with a meaningful name (so not Adam’s Preset or something, try naming it after what it does)

You’ll find the preset(s) you made on the Adjustments tool page
The presets work for single tools… If you have a selection of edits that you want to automate, you can do this by creating a style

On the Adjustments tool page, click the three little dots as shown above

And select Save User Style

In the resultant dialogue box tack all the edits you’ve made that you wish to be incorporated in your style and hit save

Again, you’ll be prompted to save and name it

You’ll find the style you made under User Styles in the Adjustments tool page

And it can be applied to which ever image(s) you want by clicking on it
C1E is, in my opinion really, REALLY good for free… but you’ll no doubt find things it can’t do, in which case you’ll need to get C1E to behave like a multi-international corporation…
….So Adam, you mean that C1E will get me a vanity yacht and holdings in the Cayman Isles?
No dude, I mean you’ll need to outsource

Using the ARROW Tool right click and select Edit With

Next pick the file format, size and application that you wish to edit with

Click edit and the app of your choice will pick up the file you’ve exported from C1E, things might vary a bit depending on which app you’re farming the work out too, but generally speaking the Tiff (or whatever) you create during this process will be in the same folder that you’re working from with the original images (like how it is in LR)
Exporting final images:
Once you’ve made your edits, you’ll want to export Jpeg (or tiff) pictures from your raw files
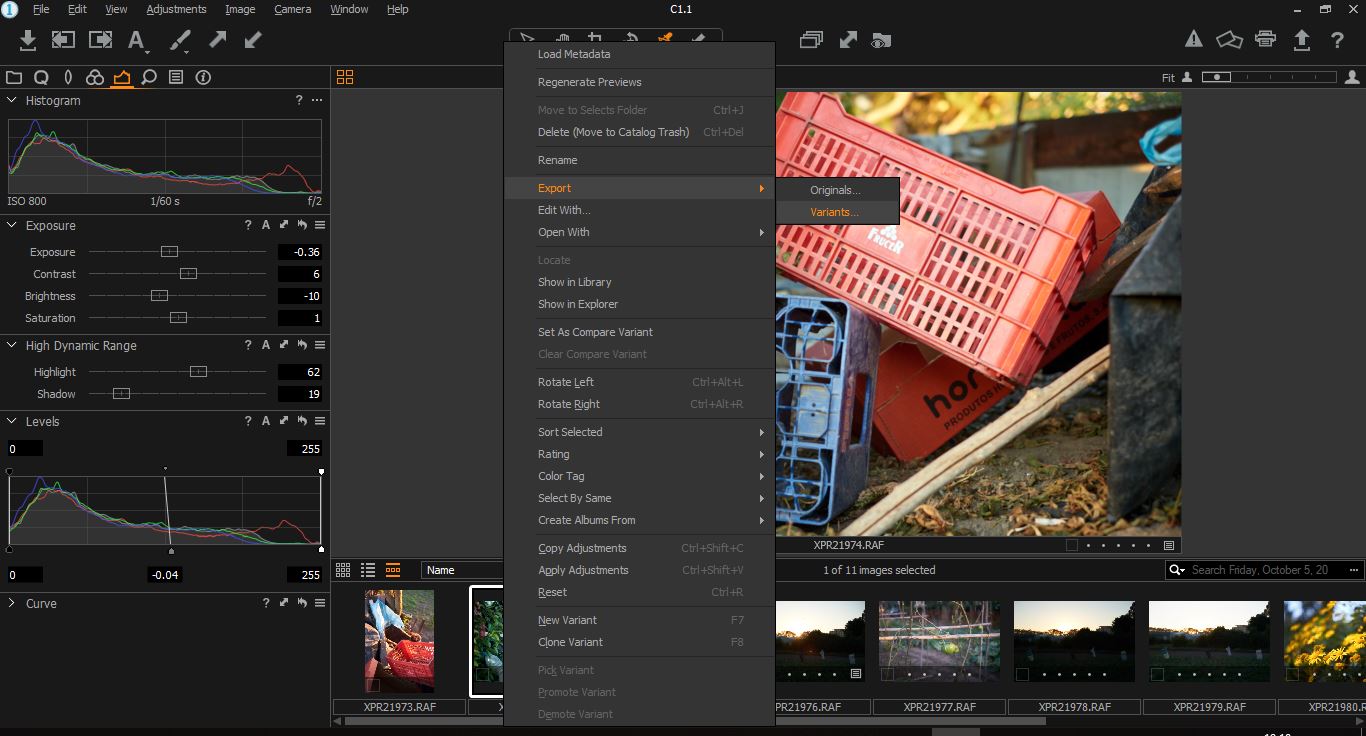
When using the ARROW TOOL you can go straight to the export process via a RIGHT CLICK on the mouse
You’ll want to select VARIANTS (originals will just move the raw file some place else)

Final Destination…
From the destination drop down menu, select “Chose Folder” and erm chose the folder where you want the image to go too

Like most apps, C1E will stick your photo(s) some place that you might not readily find, so best to micromanage this part (IMO / YMMV) and pick where YOU want the file to end up

Custom Names and sizes
I have all my apps set to give me a custom name. They tell me which app it was that I used, but more importantly it prevents any naming conflict with a Jpeg that’s come straight from the camera (I’m not just a pretty face you know…)
In this dialogue box you can also set the format, size, dimensions and colour space of the resultant file

The output adjustments
Output adjustments let you set the appropriate (or desired) amount of sharpening for the intended usage of the image (eg print or screen)
Once everything is set as you want it, click on the export button and your Fujfilm RAF will be rendered into the output file.
And that was my guide to C1E, I sincerely hope you find at least some of it useful, that you enjoyed reading it more that I did writing it…
You’re more than welcome to create a PDF of this, but PLEASE include this final line © Adam Bonn 2018
======================================
See more of my work on Instagram and Flickr
======================================
A lot of time and effort goes into this site.. Hopefully it’s helped you? Perhaps you’d consider helping me?
One way you could help me is if you want to buy from Amazon, if you do so using the links below, then I will receive a small percentage of your expenditure, and you will pay NO MORE than you would have paid anyway.
Shop at Amazon USA
Fujifilm X-Pro2 ¦ Fujifilm X-Pro2 Handgrip
¦ Shop for Fujifilm X-Pro
¦ Shop for Fujifilm X-T
¦ Fujifilm XF Lenses
¦ Fujifilm XF Acessories
Shop at Amazon UK
Fujifilm X-Pro2 ¦ Fujifilm X-Pro2 Handgrip
¦ Shop for Fujifilm X-Pro
¦ Shop for Fujifilm X-T
¦ Fujifilm XF Lenses
¦ Fujifilm XF Acessories
If there’s a different product you’re considering, then perhaps you’d drop me a line and I can send you an associate link for it?
Another way you could help, is by making a donation. The donate button can be found on the link below
Thank You Very Much!
======================================

This is a pleasant surprise, hope the promised (?) Fuji sims become reality.
LikeLike
I’m sure they will, the sims are important to Fuji and c1 is their partner so no reason why not
LikeLike
Thanks for doing this – it must have taken a very long time and hours of work. I just bought and downloaded the latest 2018 L/R CC Classic and it is as slow as an old dog. My L/R 6 was wonderful. I’m thinking of bailing on L/R and looking for something else. This may be a very good place to start. When I have some spare time I will read through this thoroughly and download some RAW files and look at the results.
Great effort!
Philip
LikeLike
Thanks for taking the time to tell me this Philip, it is quite a lot of work (making the screen shots, then attempting to get the right shot in the right place is what takes the time)
I have LR6, I’ve never been interested in LR CC.
I find that C1 does a good job with the Fuji X-Pro2 files, but that C1’s advantage with my non-Fuji camera isn’t so apparent…
But as a freebie, C1E is a lovely gift from Phase One/Fujifilm and it’s worth trying
Thanks again
Adam
LikeLike
Nice one Adam, thanks. Just going to try. Incidentally, for interest, I downloaded Darktable which I found much more effective at processing Fuji raw files than my ancient standalone Lightoom 6. Cheers Drew
LikeLike
My pleasure Drew, I hope you find it at least vaguely useful…
I think (so that’s think) I read somewhere that there’s only two or three different demosaicing algorithms and several apps use coding based on the one that work better for Fuji and others don’t
LikeLiked by 1 person
Hi Adam, in LR I’m using my camera calibrated with X-rite’s ColorChecker Passport. This allows me to better reproduce the colors I capture. Do you know if this is possible with Capture One?
LikeLike
Hi Albert,
I don’t really know I’m afraid, and if you can then I have a sneaking suspicion that you’d need the full fat version of Capture One…
I had a little search online and I found an article about a 3rd party application that claims to facilitate ColorChecker use with C1
How to Use Your ColorChecker Passport in Capture One
I hope this helps…
Regards
Adam
LikeLike
Many thanks Adam!
LikeLike
No problem Albert, I hope that the link is useful
LikeLike
Speaking of democising algo do you prefer RFC EX 3.0 or C1E?
LikeLike
I’ve never really used RFC 3 only RFC 2, silkypix 7, 8 and a tiny bit 9
Not sure to be honest! At normal viewing sizes there can’t be a lot in it
If one’s budget is freeware, then you get more for your money (!) with C1E than RFC I think, but it’s a big shame that C1E doesn’t give orientation correction like RFC does (but then RFC doesn’t have highlight/shadow recovery)
LikeLike
Hmm it looks like your website ate my first comment (it was extremely long) so I guess I’ll just sum it up what I wrote and say, I’m thoroughly enjoying your blog. I too am an aspiring blog blogger but I’m still new to the whole thing. Do you have any recommendations for inexperienced blog writers? I’d genuinely appreciate it.|
LikeLike
Sorry about that, wordpress problem I guess..
and thank you, not sure what to suggest, write frequently, find your niche that resonates with readers and stick to it
LikeLike