
So last week I exulted the partnership between Fujifilm and Phase One to bring us Capture One Express (hereafter written as C1E)
Having run a few images through it now, I’ve decided to write a basic guide about how some of it works
Now C1E maybe new to us in Fujifilm land, but Sony shooters have had something similar for a while, and the full pro version has been around for a very long time
So there’s a TON of info out there folks, this guide really won’t be the last word in all of the things that this software can do, and it’ll also be a little skewed in regards of how I like to work.
Let’s start with the basics, you’ll need to install the software!
You can download Capture One Fujifilm Express here
One you’ve clicked through the usual next/next/I accept/next/finish routine to install software you’ll need to launch the app, where you’ll be confronted with the following:
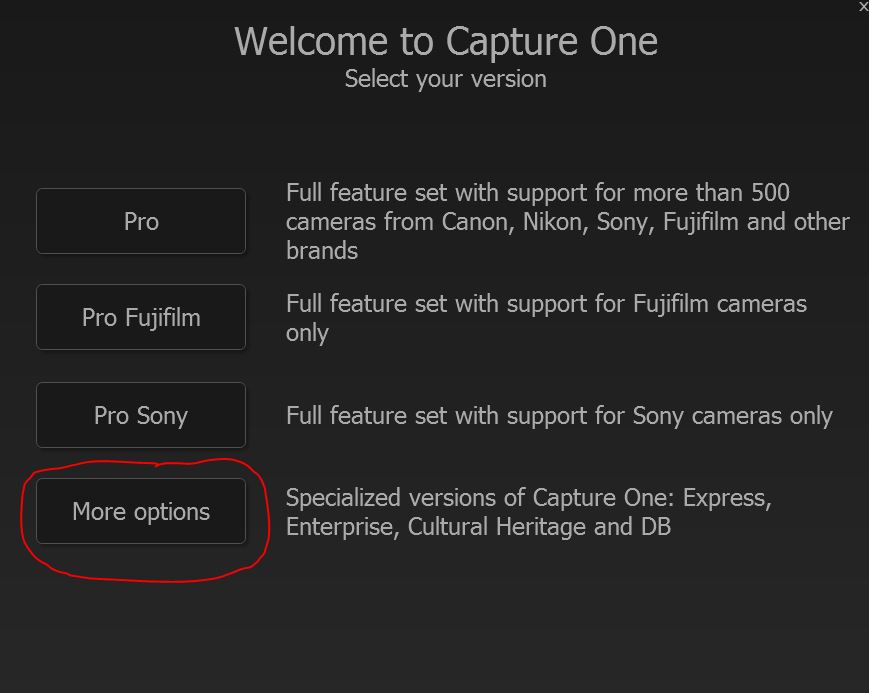
You’ll be wanting More Options (and don’t we all? 😉 )

You’ll be wanting Express Fujifilm

Once it opens, you’ll want to import some pictures to edit. Click the Import icon that I’ve circled at the top left
When it first imports RAFs C1E will set up some sort of acceleration to speed things up in the future. It’s always good to have something to look forward too, but right now you’ll be looking at a status bar crawling along the screen
I (currently) have no interest in using the catalogue feature… so I haven’t looked at it therefore I haven’t written about it…
If that feature interests you, here’s Capture One’s Tutorial Page for the catalogue.
One thing that might interest you, is importing all of your raw files straight off the SD card..

1. Select the SD card from Source where shown above
2. Select an appropriate location from the Destination drop down (“chose folder”), as current location will just copy them back to the SD card (because “current location” is where they are already) and that might create some sort of time paradox or something… well ok lost pictures anyway 🙂
3. If you’re feeling fruity and brave, you can tick the eject SD card and erase SD card as shown (being neither you’ll see I leave these blank)

Personally, what I always do, is copy the raw files off the SD card and into an indexed location on my system that I can find later, with a meaningful name… I know… so 1990s of me 😀
So here I do want current location, as these files are already where they’ll be stored. Notice I also tick “exclude duplicated” this is because I might add more files to that location later, and I only need the import box to show me the new files

The tone curve drop down from the Colour toolset
Once we have some files imported, you’ll want to edit them. (yours probably aren’t just a collection of kitschy crap that you rushed out to shoot for a web article, but the principle is the same)
To start with, I’d pick a starting point tone curve. You can see the options in my screen shot and you decide which one works best for your image(s)

The WB Tool
From the same toolset you can set the White Balance. This is pretty standard fare (as it should be) with the usual drop down menu options and the 1. Auto (let the app decide for you) option and the 2. Eye Dropper tool, where you pick something in the picture that you want to be the base for the WB

ONE THING THAT NEEDS MENTIONING is that if you pick a tool (eg WB) you’ll need to click on the hand or arrow icon afterwards in order to exit out of the tool (eg WB) that you were using. Possibly this can be turned off in the preferences… I forgot to look… normally someone writes in to tell me, I’ll let you know

Viewing distance and navigation
As everyone knows, you need to look at a photo at 100+% zoom in order to see if you like it or not… 😀 😀 😀
Relax, C1E’s got this…
If you look where I’ve skilfully marked “1” on the image, this slider makes the image bigger and smaller. Clicking on the head and shoulders icon on the far right automatically takes you too 100% view, the head and shoulders icon on the left returns you to the fit screen view. (Neither head and shoulders icon made my dandruff go away though)
Re where I’ve marked up “2” on the image, when you’re using the hand tool RIGHT CLICKING (in windows, dunno about Mac… maybe you just have to think about it and it automatically happens or something) brings up that helpful little navigation window

The Exposure Tools
Here we have the default tools that you’ll probably be familiar with if you’ve ever used any image editing software… and if you haven’t then you’ll quickly pick up on what they do.
1. The histogram, this will show you the distribution of bright/dark values in your image and updates its shape as you make edits.
2. As you’d expect.. these sliders control the items labelled – move the sliders to see the effect
3. Highlight and Shadow recovery. Move these sliders to recover highlights and shadows. Unlike many apps (eg Lightroom) these sliders can’t be used in reverse. So if you want to brighten highlights and darken shadows, then you’ll need to use the contrast slider, tone curve and/or levels tools
4. The levels tool, You have three vertical lines and dragging them will change the Shadows/Midtones/Highlights

The Details Tools
Once you’ve got your image as shiny or as dark as you want it, you’ll want to sharpen it and apply any noise reduction you want.
Like most apps C1E adds what it feels you need as a default…
I’m a weird one when it comes to sharpening and NR, and endeavour to use as little as possible… I’d also rather use structure than clarity, as clarity can introduce artefacts, but structure can bring out larger subjects in your image…
…whatever.. these are personal choices and you should find your own way
1. Is sharpening
2. Is Noise Reduction
3. Is Clarity and Structure

You can see the settings I PERSONALLY selected for this throwaway shot, and now how it looks at a normal viewing size
Once you’ve made your edits, you’ll want to export Jpeg (or tiff) pictures from your raw files
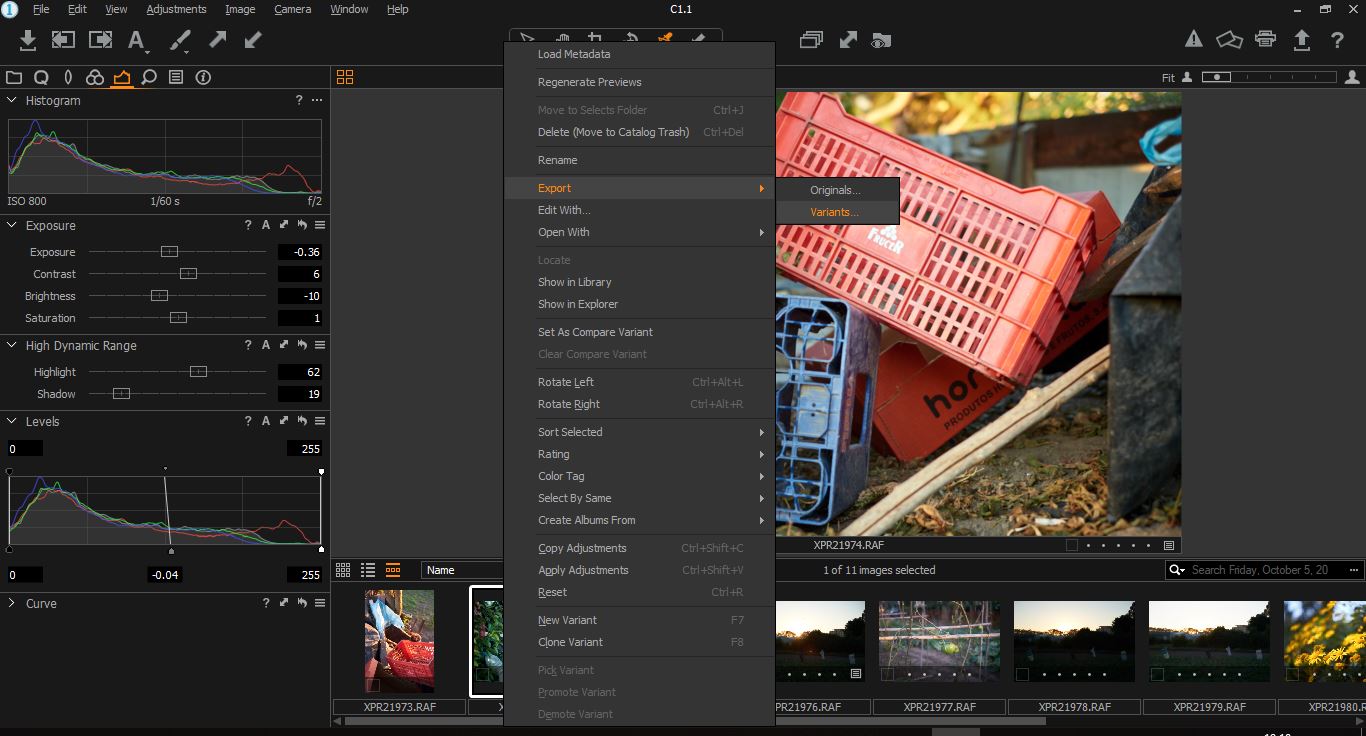
When using the ARROW TOOL you can go straight to the export process via a RIGHT CLICK on the mouse
You’ll want to select VARIANTS (originals will just move the raw file some place else)

Final Destination…
From the destination drop down menu, select “Chose Folder” and erm chose the folder where you want the image to go too

Like most apps, C1E will stick your photo(s) some place that you might not readily find, so best to micromanage this part (IMO / YMMV) and pick where YOU want the file to end up

Custom Names and sizes
I have all my apps set to give me a custom name. They tell me which app it was that I used, but more importantly it prevents any naming conflict with a Jpeg that’s come straight from the camera (I’m not just a pretty face you know…)
In this dialogue box you can also set the format, size, dimensions and colour space of the resultant file

The output adjustments
Output adjustments let you set the appropriate (or desired) amount of sharpening for the intended usage of the image (eg print or screen)
Once everything is set as you want it, click on the export button and your Fujfilm RAF will be rendered into the output file.
Next time we’ll cover presets, user styles, curves, colour editing and black and white editing, plus a little bit more!
See you then!
======================================
See more of my work on Instagram and Flickr
======================================
A lot of time and effort goes into this site.. Hopefully it’s helped you? Perhaps you’d consider helping me?
One way you could help me is if you want to buy from Amazon, if you do so using the links below, then I will receive a small percentage of your expenditure, and you will pay NO MORE than you would have paid anyway.
Shop at Amazon USA
Fujifilm X-Pro2 ¦ Fujifilm X-Pro2 Handgrip
¦ Shop for Fujifilm X-Pro
¦ Shop for Fujifilm X-T
¦ Fujifilm XF Lenses
¦ Fujifilm XF Acessories
Shop at Amazon UK
Fujifilm X-Pro2 ¦ Fujifilm X-Pro2 Handgrip
¦ Shop for Fujifilm X-Pro
¦ Shop for Fujifilm X-T
¦ Fujifilm XF Lenses
¦ Fujifilm XF Acessories
If there’s a different product you’re considering, then perhaps you’d drop me a line and I can send you an associate link for it?
Another way you could help, is by making a donation. The donate button can be found on the link below
Thank You Very Much!
======================================
The X-Pro Series Content: Referenced and All In One Place
The X-Pro Series Content: A Contents Page with Page Numbers and a Brief Description

Thank you, Adam! Looking forward to the next article on this.
LikeLike
No problem, I glad you liked it (these things aren’t very fun to write to be honest)
LikeLike