
So last week I wrote my Fujifilm Capture One Express Guide: Part One Importing and Basic Editing, and this week (as promised) is the second part
This time we’ll cover multi image edits, presets, user styles, curves, colour editing and black and white editing!
When we have images that share a commonality (usually ones that were taken at the same time/place/light/subject) it can be very useful to apply a series of edits to many images at once.
C1E can do that for you, but first you’ll need to set up a couple of things.

Thsi can be done via the menus, but I like to use toolbars. In order to do this you’ll need to right click on the area at the top of the screen which makes the CUSTOMISE button appear – click on this button

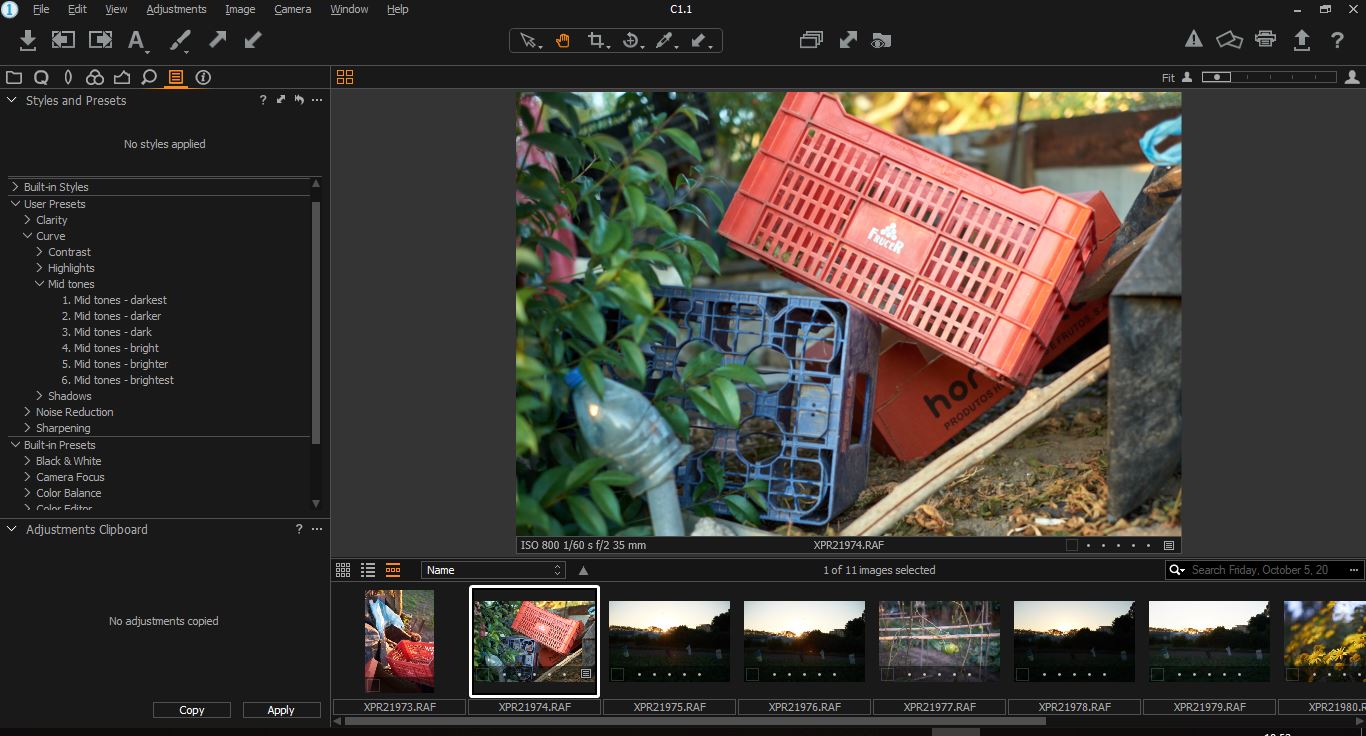
Here you can see the icons that can be dragged onto the tool bar, I’ve circled
1. Hot Folder (which I assume is for tethering)
2. Copy and Apply Adjustments
3. Edit all Selected Variants

You LITERALLY drag the icons you want onto the tool bar at the top of the C1E screen

To use the copy/paste across many images, first you’ll need to click the stacked images icon as shown above, then click on the image that you want to copy the edits from

Next click on the DOUBLE HEADED ARROW icon, this will bring up the clip board menu from which you can select which edits you want to copy, the default is all the edits you’ve made to the selected image, so you’ll need to UNTICK any you don’t want to copy and paste to a different image

Next select the images you wish to apply the edits too

To paste the edits to your desired image(s), can either right click on one of the selected images and click Apply Adjustments or if you prefer use the Apply function from the doubled headed arrow tool (which you used to copy the adjustments in the first place)
Now you know how to apply edits to multiple images, let’s look at a few more advanced editing techniques you can use.
At the time of writing (about 1pm GMT, 8th of October 2018), C1E doesn’t support the native Fujifilm Film Sims. There’s some user developed ones out there that can get you by until C1E adds its own, but there’s also another way to quickly and easily change your colour profile…

Next to where it says ICC Profile on the colour tab, you’ll find a drop down menu that shows which camera you used (in my case it says Fujifilm FinePix X-Pro2 Generic) in that drop down menu you’ll find the line item Show All. Click this.

This brings up the list of C1’s profiles for lots and lots (and lots) of cameras… Pay attention to the colours in the image I have selected….

…..they completely change as I select a different camera profile. There’s MANY cameras listed in there, so you’ll just have to play around and find your favourites. I think of this as a Non-Fujifilm film sim fudge, but it’s a useful ‘hack’ to have.
In a similar vein is the lens profile menu.

Typically you’d want to use the manufacturer profile if you’re using a Fujifilm with Fujifilm glass… But what if you’ve adapted a lens from another manufacturer to use on your Fujifilm?

As with the camera profiles, first you’ll have to click Show All then a list of all the supported lenses with a C1 profile appear… in this example, perhaps you have a Leica 35mm Summicron on your Fujifilm, so you might want to use the profile for that lens.
While we’re on the subject of lenses….

The parts I’ve circled here enable you to add (or remove) a vignette and reduce/remove purple fringing
Also in the lens tools section is the crop tool
 If you click on the icon that looks like an upside down @ symbol (that I’ve circled) you get a tool that enables you to draw a straight line in the image, and the image will be pivoted around this line so that the image is level.
When you’ve finished using this tool, you’ll need to click on either the hand or the arrow icon to exit out of it
From the same toolset, you can crop the image

The crop tool, selecting aspect ratio
 You can specify various if you want to crop outside of the image. AGAIN when you’re finished you’ll need to click on either the hand or the arrow icon to exit from the crop tool
Next we’ll look at colour editing.
 On the Colour (Color) tool page you’ll find the colour wheel (well the parts of it that C1 have bothered to mark with a line, I mean just because green and yellow are next to each other it doesn’t mean there’s no dividing line… I digress… Adam get on with it)
If you see where I’ve circled the eye dropped tool? This tool allows you to select a colour to be edited

Clicking the View Selected Colour Range allows you to work with just the colour you want (so no I didn’t suddenly get into selective colour photography)

Here I’ve made the yellow flowers, even more yellow (I think the extra yellow represents the anguish of the human condition as the flowers hold up a mirror to society, or possibly it’s just some kitschy crap I snapped for this article)
Of course it may be that you really want to make a black and white photo.
 Still in the colour tools section, you’ll find the Black and White tool (and yes, for this kitschy crap shot, I couldn’t even be bothered to leave the house to make the sample photo)
The Black and White tool is easy to use, simply tick that box (circled) and….
 …instant black and white, but what if you want to blend (see what I did there? I’m here all week folks) the tones of your BW conversion a bit? Well you do this by using the colour sliders (like in LR, Silver Efex etc etc) to control the luminosity of the various hue tones (and SERIOUSLY and on an unrelated note, if you want to teach yourself colour, playing with these sliders in BW really shows you what hues make up the colours you see in a colour image)
After you’ve made a BW image you might want to add some fake grain…
To do that, head over to the Adjustments tool page
 C1E has some input presets to control various things
 Here can see the effect of adding their various grain presets (I think the pro paid for version lets you specify your own grain)
And speaking of inbuilt styles…
C1E has a whole bunch of them for you to use either ‘as is’ or as the basis of further editing

Here we see the in-built styles for contrast (note that others are available)
But what do these presets actually do?

The change the tone curve, you can refine (or f__k up, it’s your choice) the tone curve by dragging these points around or by creating new ones
Speaking of presets and styles.. you might want to create your own
 In the single tools (so this one is sharpening) you can click on the three horizonal lines icon and save the current settings as a User Preset

You’ll need to select which parts of the tool options make up your preset

Then save it with a meaningful name (so not Adam’s Preset or something, try naming it after what it does)

You’ll find the preset(s) you made on the Adjustments tool page
The presets work for single tools… If you have a selection of edits that you want to automate, you can do this by creating a style

On the Adjustments tool page, click the three little dots as shown above

And select Save User Style

In the resultant dialogue box tack all the edits you’ve made that you wish to be incorporated in your style and hit save

Again, you’ll be prompted to save and name it

You’ll find the style you made under User Styles in the Adjustments tool page

And it can be applied to which ever image(s) you want by clicking on it
C1E is, in my opinion really, REALLY good for free… but you’ll no doubt find things it can’t do, in which case you’ll need to get C1E to behave like a multi-international corporation…
….So Adam, you mean that C1E will get me a vanity yacht and holdings in the Cayman Isles?
No dude, I mean you’ll need to outsource

Using the ARROW Tool right click and select Edit With

Next pick the file format, size and application that you wish to edit with

Click edit and the app of your choice will pick up the file you’ve exported from C1E
And that was my guide to C1E, I sincerely hope you enjoyed reading it more that I did writing it…
On the whole I’m really impressed with C1E, not only is it pretty featured filled for the zero cost, if you factor in it’s ability to farm out editing to your other apps then you really have a great functionality to get your pictures looking how you want them.
======================================
See more of my work on Instagram and Flickr
======================================
A lot of time and effort goes into this site.. Hopefully it’s helped you? Perhaps you’d consider helping me?
One way you could help me is if you want to buy from Amazon, if you do so using the links below, then I will receive a small percentage of your expenditure, and you will pay NO MORE than you would have paid anyway.
Shop at Amazon USA
Fujifilm X-Pro2 ¦ Fujifilm X-Pro2 Handgrip
¦ Shop for Fujifilm X-Pro
¦ Shop for Fujifilm X-T
¦ Fujifilm XF Lenses
¦ Fujifilm XF Acessories
Shop at Amazon UK
Fujifilm X-Pro2 ¦ Fujifilm X-Pro2 Handgrip
¦ Shop for Fujifilm X-Pro
¦ Shop for Fujifilm X-T
¦ Fujifilm XF Lenses
¦ Fujifilm XF Acessories
If there’s a different product you’re considering, then perhaps you’d drop me a line and I can send you an associate link for it?
Another way you could help, is by making a donation. The donate button can be found on the link below
Thank You Very Much!
======================================
The X-Pro Series Content: Referenced and All In One Place
The X-Pro Series Content: A Contents Page with Page Numbers and a Brief Description

Very well done Adam, as usual.
LikeLike
Thank you very much Elliot,
Truth be told, I don’t really enjoy writting these things
LikeLike